스프링부트! 게시판 만들면서 배우기! 5. 게시물 상세정보 구현하기
이번글에는 게시물을 클릭 했을 시 상세정보를 보여줄 수 있도록 구현해보도록 하겠습니다.
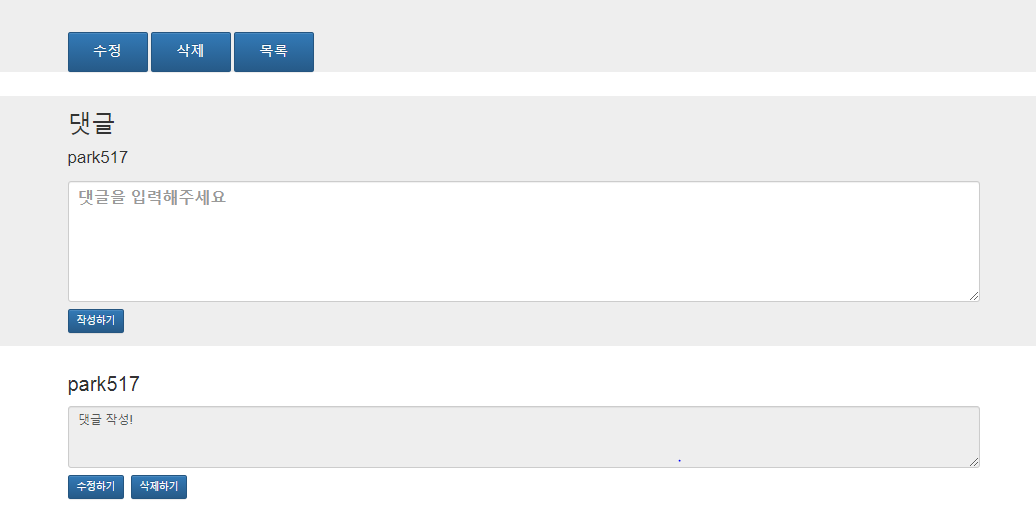
우선 Detail.jsp입니다.
제목, 첨부파일 , 내용을 볼 수있으며

로그인 한 상태이고 해당 글을 작성한 사람이라면 수정 삭제가 보이도록 하였습니다.

하단에는 댓글을 달 수 있도록 만들었습니다.
Detail.jsp
<%@ page language="java" contentType="text/html; charset=UTF-8"
    pageEncoding="UTF-8"%>
<%@ taglib prefix="c"   uri="http://java.sun.com/jsp/jstl/core" %>
<!DOCTYPE html>
<html>
<head>
<meta charset="UTF-8">

<%@include file="../part/head.jspf" %>
<link rel="stylesheet" href="/resource/detail.css">
<title>board</title>

</head>
<body>
	<%@include file="../part/nav.jspf" %>

	<!-- 글이 상세내용이 보여지는 곳  -->
	<div class="jumbotron">
		<article>
			<div class="container" role="main">
				<h1>글 내용 보기</h1>
				<form name="form" id="form" role="form" method="post" action="./modify?aid=${article.aid}">
					<div class="mb-3">
						<label for="title">제목</label>
						<input type="text" class="form-control" name="title" id="title" readonly="readonly" value="${article.title}">
	                </div>
	                <c:if test="${!empty file}">
		                <div class="mb-3">
							<label for="title">첨부파일</label>
							<c:forEach var="files" items="${file}" varStatus="status">
							<p><a href="/article/fileDown/${files.aid}/${status.index}">${files.fileRealName}</a><p>
						    </c:forEach>
		                </div>

	                </c:if>

					<div class="mb-3">
						<label for="content">내용</label>
						<textarea class="form-control" rows="5" name="contents" id="content" readonly="readonly">${article.contents}</textarea>
					</div>

				</form>
				<div class="btn_group">
					<c:if test="${article.mid eq loginMember.mid}">
						<button type="button" class="btn btn-sm btn-primary" id="btnUpdate">수정</button>
						<button type="button" class="btn btn-sm btn-primary" id="btnDelete" onclick="deleteArticle(${article.aid})">삭제</button>
					</c:if>
					<button type="button" class="btn btn-sm btn-primary" id="btnList">목록</button>

				</div>

			</div>
		</article>
	</div>

	<!-- 댓글 다는 곳 로그인 시에만 보인다. -->

	<c:if test="${!empty loginMember}">
		<div class="jumbotron">
			<article>
				<div class="container" role="main">
					<h2>댓글</h2>
					<form name="form" id="comment_form" role="form" method="post" action="/article/doAddComment">

						<div class="mb-3">
							<p>${loginMember.mid}</p>
							<input type="hidden" value="${article.aid}" name="aid">
							<textarea class="form-control" rows="5" name="comment" id="content" placeholder="댓글을 입력해주세요"></textarea>
							<button type="submit" class="btn btn-sm btn-primary" id="btnCommentWrite">작성하기</button>
						</div>


					</form>
				</div>
			</article>
		</div>
	</c:if>

		<!-- 댓글 리스트 -->

			<c:forEach var="comment" items="${commentList}">
				<div class="container" id="comment_wrap" role="main">
					<form name="form" id="comment_form" role="form" method="post" action="/article/updateComment?sid=${comment.sid}">
						<input type="hidden" name="sid" value="${comment.sid}">
						<div class="mb-3">
							<p>${comment.mid}</p>
							<textarea class="form-control" rows="3" name="comment" id="content${comment.sid}" readonly>${comment.scontents}</textarea>
							<c:if test="${comment.mid eq loginMember.mid}">
								<div class="update_btn_group" id="update_btn_group${comment.sid}">
									<button type="button" class="btn btn-sm btn-primary" id="btnCommentWrite" onclick="updateComment(${comment.sid})">수정하기</button>
									<button type="button" class="btn btn-sm btn-primary" onclick="deleteComment(${comment.sid})" >삭제하기</button>
								</div>
								<div class="doUpdate_btn_group" id="doUpdate_btn_group${comment.sid}" style="display: none;" >
									<button type="submit" class="btn btn-sm btn-primary">수정완료</button>
									<button type="button" class="btn btn-sm btn-primary" onclick="cancleUpdate(${comment.sid},'${comment.scontents}')" >취소하기</button>
								</div>
							</c:if>
						</div>
					</form>
				</div>
			</c:forEach>

<script src="/js/detail.js"></script>
</body>

</html>
이제 Dao -> Service -> Controller 순으로 보겠습니다
우선 Dao입니다.
ArticleDao.java
게시물아이디를 파라미터로 받아 해당글을 반환할 수 있도록 했습니다.
hitUp은 해당 게시물을 눌렀을 시 조회수 증가를 위한 메소드 입니다.
public Article getOne(long aid);
public void hitUp(long aid);
ArticleDao.xml
	<select id="getOne" parameterType="long" resultType="Article">

		SELECT *
		FROM article
		WHERE aid = #{aid}

	</select>


	<update id="hitUp" parameterType="long">
		UPDATE article
		SET hit = hit+1
		WHERE aid = #{aid}
	</update>
다음은 Service를 보겠습니다
ArticleService.java
	public Article getOne(long aid);
	public void hitUp(long aid);
ArticleServiceImpl.java
getOne은 aid에 맞는 Article를 반환하고
hitUp은 조회수 증가로 반환 타입이 없습니다.
	@Override
	public Article getOne(long aid) {
		Article article = articleDao.getOne(aid);
		return article;
	}
    @Override
	public void hitUp(long aid) {
		articleDao.hitUp(aid);
	}
다음은 File 목록도 가져와야하므로 FileDao를 보겠습니다.
FileDao.java
package com.example.starter.dao;

import java.util.List;

import org.apache.ibatis.annotations.Mapper;

import com.example.starter.dto.FileDto;

@Mapper
public interface FileDao {
	public int insertFile(List<FileDto> files);
	public List<FileDto> getFile(long aid);
}
FileDao.xml
<?xml version="1.0" encoding="UTF-8"?>
<!DOCTYPE mapper PUBLIC "-//mybatis.org//DTD Mapper 3.0//EN" "http://mybatis.org/dtd/mybatis-3-mapper.dtd">

<mapper namespace = "com.example.starter.dao.FileDao">
		<!--useGeneratedKeys = 생성할 때 생기는 기본키 가져와서 id에 맵핑하기 -->
	<!-- #{} 와 ${}의 차이 #{}은 자동으로 ''가 생성되어 들어간다  -->
	<insert id ="insertFile" parameterType = "list">
		INSERT INTO file
			(aid,fileRealName,fileName,path)
		values
		<foreach collection="list" item ="item" separator =",">
		(
			#{item.aid},
			#{item.fileRealName},
			#{item.fileName},
			#{item.path}
		)
		</foreach>
	</insert>

	<select id="getFile" parameterType="long" resultType="FileDto">
		select * from file
		where aid = #{aid}
	</select>

</mapper>
FileService.java
package com.example.starter.service;

import java.util.List;

import com.example.starter.dto.FileDto;

public interface FileService {
	public int insertFile(List<FileDto> files);
	public List<FileDto> getFile(Long aid);
}
FileServiceImpl.java
package com.example.starter.service;

import java.util.List;

import org.springframework.beans.factory.annotation.Autowired;
import org.springframework.stereotype.Service;

import com.example.starter.dao.FileDao;
import com.example.starter.dao.MemberDao;
import com.example.starter.dto.FileDto;

import lombok.extern.slf4j.Slf4j;

@Slf4j
@Service
public class FileServiceImpl implements FileService{

	@Autowired
	FileDao fileDao;
	@Override
	public int insertFile(List<FileDto> files) {

		return fileDao.insertFile(files);
	}

	@Override
	public List<FileDto> getFile(Long aid) {
		return fileDao.getFile(aid);
	}

}
자 다음은 댓글에 대한 내용입니다.
우선 댓글의 내용을 담아줄 Dto를 만들어 줍니다
CommentDto.java
작성자를 구별할 mid , 해당 게시물을 구별하기 위한 aid , 댓글을 구별하기위한 sid , 댓글 내용인 scontents로 되어있습니다.
package com.example.starter.dto;

import lombok.AllArgsConstructor;
import lombok.Data;
import lombok.NoArgsConstructor;

@Data
@NoArgsConstructor
@AllArgsConstructor
public class CommentDto {
	private long sid;
	private long aid;
	private String mid;
	private String scontents;
}
CommentDao.java
각각 댓글의 CRUD을 수행할 메소드 입니다.
package com.example.starter.dao;

import java.util.List;

import org.apache.ibatis.annotations.Mapper;

import com.example.starter.dto.CommentDto;

@Mapper
public interface CommentDao {
	public int addComment(CommentDto commentDto);
	public List<CommentDto> getComment(long aid);
	public void deleteComment(long sid);
	public void updateComment(long sid ,String scontents);
}
CommentDao.xml
<?xml version="1.0" encoding="UTF-8"?>
<!DOCTYPE mapper PUBLIC "-//mybatis.org//DTD Mapper 3.0//EN" "http://mybatis.org/dtd/mybatis-3-mapper.dtd">

<mapper namespace = "com.example.starter.dao.CommentDao">

	<select id ="getComment" parameterType = "long" resultType="CommentDto">
		SELECT * FROM comment
		where aid = ${aid}
	</select>

	<!--useGeneratedKeys = 생성할 때 생기는 기본키 가져와서 id에 맵핑하기 -->
	<!-- #{} 와 ${}의 차이 #{}은 자동으로 ''가 생성되어 들어간다  -->
	<insert id ="addComment" parameterType = "CommentDto" useGeneratedKeys="true" keyProperty = "aid" >

		INSERT INTO comment
		SET	aid = #{aid},
		mid = #{mid},
		scontents = #{scontents}

	</insert>

	<delete id="deleteComment" parameterType="long">
		DELETE FROM comment
		WHERE sid = ${sid}
	</delete>

	<update id ="updateComment" parameterType="long" >
		UPDATE comment
		SET scontents = #{scontents}
		WHERE sid = ${sid}
	</update>


</mapper>
CommentService.java
package com.example.starter.service;

import java.util.List;

import com.example.starter.dto.CommentDto;

public interface CommentService {
	public int addComment(CommentDto commentDto);
	public List<CommentDto> getComment(long aid);
	public void deleteComment(long sid);
	public void updateComment(long sid , String scontents);
}
CommentServiceImpl.java
package com.example.starter.service;

import java.util.List;

import org.springframework.beans.factory.annotation.Autowired;
import org.springframework.stereotype.Service;

import com.example.starter.dao.CommentDao;
import com.example.starter.dto.CommentDto;

@Service
public class CommentServiceImpl implements CommentService{

	@Autowired
	CommentDao commentDao;

	@Override
	public int addComment(CommentDto commentDto) {
		commentDao.addComment(commentDto);
		return 0;
	}

	@Override
	public List<CommentDto> getComment(long aid) {
		return commentDao.getComment(aid);
	}

	@Override
	public void deleteComment(long sid) {
		commentDao.deleteComment(sid);

	}

	@Override
	public void updateComment(long sid , String scontents) {
		commentDao.updateComment(sid,scontents);

	}


}
마지막으로 Controller를 보겠습니다.
ArticleController.java
	@RequestMapping("/article/detail")
	public String showDetail(Model model , long aid) {
		List<FileDto> files = fileService.getFile(aid);
		Article article = articleService.getOne(aid);
		List<CommentDto> list = commentService.getComment(aid);
		articleService.hitUp(aid);
		model.addAttribute("file",files);
		model.addAttribute("article", article);
		model.addAttribute("commentList",list);
		return "article/detail";
	}
게시물을 클릭하여 /article/detail로 요청이 들어오면
getFile메소드를 통하여 해당 게시물의 파일 리스트들을 불러옵니다.
그 후 articleService.getOne를 통하여 해당 아이디의 게시물을 불러옵니다.
articleService.hitUp을 통해서 조회수도 증가시키구요
commentService.getComment를 통해 해당 게시물의 댓글들도 가져와줍니다.
그 후
Model 객체에 files,article, 댓글 list들을 담아 detail에 넘겨줍니다.
자 이렇게 게시물 상세정보보기도 구현이 됫구요!
다음글에서는 게시물 삭제 수정을 구현해보도록하겠습니다.
점점 글 쓰는거에 대해 소홀해지네요 ㅠㅠ 바쁜것두 있지만..★
다음글부터는 정신 바짝 차리고 써보겠습니다!
봐주셔서 감사합니다
피드백은 언제나 환영입니다!!